
|
Access Macros Home Microsoft Excel Microsoft Access Custom Reports SQL Server Visual Basic |
Microsoft put a powerful macro utility into Microsoft Access. To confuse matters,
however, it is not like macros in Excel
or Word. In Excel or Word, the primary way that intermediate users create macros is to record a series of steps
in a document that they do repetitively, and save the macro for later use. In Microsoft Access, there is no
recording facility. To further the confusion, when an Excel user creates a macro, it is
written in Visual Basic for Applications (VBA);
to create an Access macro, you select a series commands in a dialog box. What access calls "modules" is the
"macro" language for Word or Excel. Nonetheless, the macro facility in Access is incredibly easy to use, and yet
it can create powerful results. To illustrate this, we will step through the process of building a "switchboard", or a form that acts like a menu to open the Customer form or the Customer report developed in the Forms and Reports pages. Although there are illustrations on this page, actually creating the switchboard is more instructive than reading the pages. To get started, create a new form in form design view (choose the Create tab on the ribbon, then choose Form Design). Access will now display a blank form to work form. Parts of the screen are annotated to point out areas that will be used to create this: 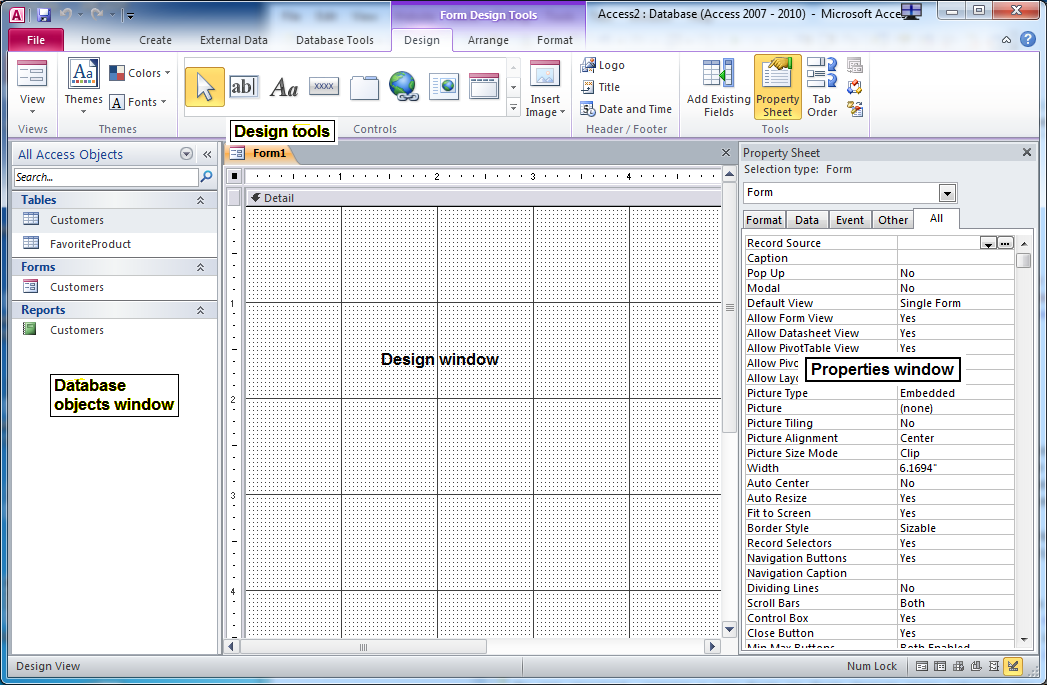
We will add four command buttons to this window. They will be used as follows:
First, create the four buttons needed. This will be illustrated with the Access control wizard turned off. Turn the wizard of by clicking on the drop down arrow  at the lower right corner of the Controls section in the Form Design ribbon. If the Use Control Wizards
option is selected, the wizard option will be highlighted in yellow:
at the lower right corner of the Controls section in the Form Design ribbon. If the Use Control Wizards
option is selected, the wizard option will be highlighted in yellow: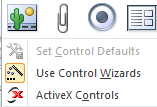 Click once to turn it off. The selection will then appear like this: 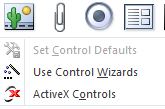 While the control wizards help design macros, to illustrate the design more clearly, this will be illustrated with the wizards inactive. As you design other items, feel free to turn the wizards on or off as desired. Click on the command button tool in the toolbar:  Position the mouse pointer near the top of the form. The mouse pointer will change appearance to indicate that a command button will be created. Click the mouse pointer at about 1/2 inch from the top of the form, and 1 inch from the left side of the form. A button will be created with the caption "Command1." Repeat this step three more times to create a total of four command buttons on the form:  Next, change the caption of the buttons to be "Add Customers," "Browse Customers," "Customer Report," and "Exit." To change the caption, either click once on the button, locate the Caption property in the Properties window (you must either have the "format" or "all" tab selected at the top of the property sheet), or click once on the button, then click inside the button a second time (don't do it fast enough to make it a double-click), then change the text to the desired title. Change the first button caption to "Add Customers," the second to "Browse Customers," the third to "Customer Report," and the fourth to "Exit." The text will not all display, because the buttons are too small as they were added. Resize them by clicking on one button. Selection/sizing handles appear. Drag the middle right sizing handle to the right to make the button larger:  With the button captions added and the buttons resized, the form would appear something like this:  Now, right click on the first button (or select the first button, and in the properties window, find the OnClick property, and click the ellipsis next to it), which presents the Choose Builder dialog box: 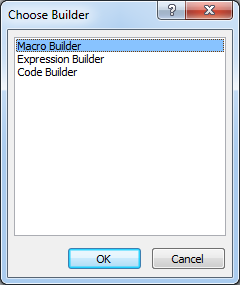
Choose the Macro builder option, and choose OK. Now a window labeled Command0:OnClick opens, with one combo box to enter an action. Choose OpenForm. Once this selection is made, the window presents the options for opening the form. In the FormName, choose Customers. Change the Data Mode to Add, which will cause the form to open in Add mode, not displaying the existing records. Then add a new action to close a form. The Main Switchboard form will be closed. Choose CloseWindow. In the newly presented options, choose Form as the object type, your switchboard's form name (frmMSB in my example). The window now appears as follows: 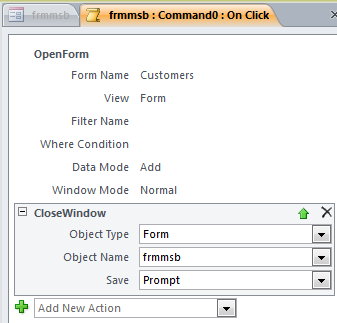 Once you have entered this, choose the close "X" in the upper right of the designer window. Access will ask if you want to save your changes, choose Yes. Repeat these steps for each of the buttons as follows:
Note that, in the OpenReport action, changing the View to Print Preview is necessary. The default view is deceptively labeled "report," which actually sends the document to the default printer. Save and close the switchboard. If you haven't named the form yet, a name like MainSwitchboard is suggested. The switchboard will now either open the Customers form or the Customers report, or close the database. To finish our example, we'd want to put actions in the Customers form or the Customers report that reopen the switchboard when complete. Start with the Customers form. Open it in design view. Make sure the form is selected, rather than any object on it. Select the form either by clicking on the box at the upper left corner of the design window, or opening the combo box at the top of the Property Sheet window, and choosing Form. This is illustrated as follows: 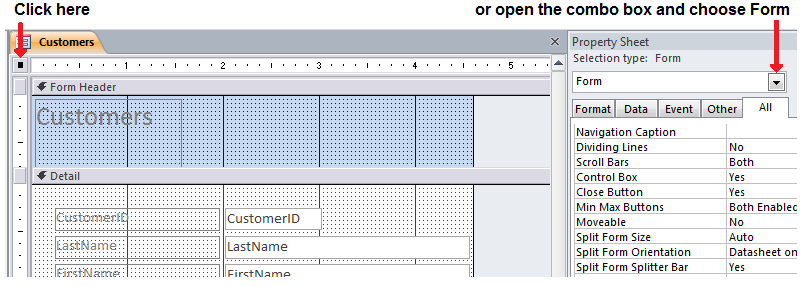
Locate the OnClose property, click on the ellipsis (...) button, and choose the Macro builder. The only action necessary here is to choose OpenForm as the action, and choose frmMsb (or whatever you named your switchboard) as the form name. Save and close the macro window. Follow the same steps for the Customers report. Following the steps above, a simple form has been coded to function as a menu, and you have automated your database. Naturally, there would be more work involved to make this a fully functional system, but that would only require completing similar actions for an orders form, an orders report, and other objects. We develop Access databases from our Denver office that make working with data easy, and it is cheaper than you think! Call us at (303) 403-0386 or request Access assistance by e-mail. |
Copyright 2012 Front Range Data Management Services